
Guides
How to start a sourdough starter from scratch in 7 days
Two ingredients, one jar, seven days. The honest version - including the days when nothing seems to be happening.

Key takeaways
Day 1: mix
50g whole-grain flour + 50g lukewarm water in a clean jar. Stir, lid loose, leave on the counter. Mark the level with a rubber band.
Days 2-3: feed once a day
Discard most of the jar so ~50g remains. Add 50g flour + 50g water. Stir. Mark the new level.
Days 4-6: feed twice a day
Same ratio, every 12 hours. Don't worry if day 4 looks dead - the population is shifting.
Day 7: confirm reliable doubling
After a feed, the starter should double within 6-12 hours and smell pleasantly tangy. If yes - bake. If not, give it 2-3 more days; warmth helps.
Day 8+: move to weekly fridge maintenance
Unless you bake often, keep it in the fridge and feed once a week. Before a bake, wake it with 1-3 room-temp feeds 12h apart so it peaks. Shrink the build (e.g. 20g starter + 40g flour + 40g water) to waste less.
What you actually need
A clean glass jar (250-500ml), whole-grain flour (rye is fastest, whole wheat works too), filtered or non-chlorinated water, a kitchen scale, and a rubber band to mark the starter's level. Skip the fancy crocks for v1 - a jam jar with the lid resting loose on top is what most experienced bakers actually use. The lid stays loose so CO2 can escape. One note on water: chlorine is added to tap water specifically to kill microorganisms. If your tap water is heavily chlorinated, it will suppress your starter. Use bottled spring water, filtered water, or draw tap water into a pitcher and let it sit uncovered for 12-24h - the chlorine dissipates on its own.
The simple feeding ratio
Every feed: throw away most of what's in the jar so you have ~50g left, then add 50g flour and 50g water. Stir thoroughly. That's a 1:1:1 ratio (starter : flour : water by weight). Repeat once a day for the first 3 days, then twice a day from day 4 onwards. The discard for the first three days really does just go to compost; once the starter is alive, you can use the discard for pancakes or crackers.
What you should see, and when
Day 1: nothing visible, mild flour smell. Day 2: a few small bubbles, possibly a slightly tangy or vinegary smell. Day 3-4: this is where most beginners panic. The bubbles often slow down or stop completely; the smell can turn briefly unpleasant. This is normal - when flour meets water, over 150 different yeast and bacterial species are activated at once. The first big rise on day 3-4 often comes from bacteria that aren't the ones you ultimately want. As you keep feeding and acidity builds, the acid-tolerant wild yeast and lactic acid bacteria win the competition and take over. Day 5-6: real activity returns; the starter doubles in 6-12 hours after a feed. Day 7: it's reliably doubling. You're done.
The float test - and why I don't trust it
The famous float test (drop a teaspoon of starter in water; if it floats, it's ready) gives false negatives often enough that I've stopped relying on it. A reliably-doubling starter that doesn't float still bakes great bread. Better signal: take a photo of the jar at feed-time, take another 8 hours later. If the second photo is visibly twice as tall, you're in business.
Once it doubles: your first bake, then the fridge
Reliable doubling on day 7 means the starter is active - but raising a whole loaf takes more strength than passing a feed test. For most people the first genuinely good loaf comes after 10-14 days, and the starter keeps gaining power for 3-4 weeks. So bake early, expect the first loaf or two to be a little flat, and keep going. The readiness bar for a first bake: it doubles within 4-8 hours, smells pleasantly tangy, and does it on three feeds in a row.
Unless you bake several times a week, you do not keep feeding twice a day forever - that's the part nobody tells beginners. Once the starter is established, move it to the fridge and feed it once a week. The cold slows the colony to a crawl. The weekly rhythm: take it out, feed it, leave it on the counter a few hours, then put it back. Before a bake, wake it with 1-3 room-temperature feeds 12 hours apart so it's at peak when you mix - a starter straight from the cold can't raise bread on its own.
Go ahead and name it
Bakers name their starters (Bread Pitt, Clint Yeastwood) for a reason: a named, journaled starter is one you keep alive. Some have been passed down for decades. Yours starts this week - give it a name and a journal, and it can outlast the jar.
When it stalls (and it will)
The single most common false alarm: 'it's not rising.' Usually it rose and fell while you weren't looking - at a warm 26°C a young starter can peak at hour 4-6 and collapse by hour 8, so by the time you check at the 12 or 24-hour mark it looks dead. Mark the jar at feeding and watch for the high point; that's why the photo habit matters. If it's genuinely sluggish, three things wake it: warmth (oven with the light on, ~25-27°C), feeding it the same flour it was born on (switching brands resets its adaptation), and a spoonful of whole rye in the next feed. Detailed rescue steps live in the dead-starter guide.
If it surged on day 2-3 and then went quiet, you didn't kill it - that early burst is usually a bloom of bacteria (often Leuconostoc) that gets out-competed as acidity builds and the real wild yeast and lactic-acid bacteria take over. The quiet days 3-5 are the changing of the guard. Keep feeding on schedule and it comes back stronger.
Hooch, cloudy liquid, or mold?
Learn to read the jar. A thin layer of liquid on top - clear, grey, or brown - is hooch: alcohol the colony makes when it runs out of food. It means hungry, not dead. Pour it off (less sour) or stir it back in (more sour), then feed. Mold is a completely different thing: fuzzy raised spots, or pink, orange, green, or black streaks. Mold means discard the whole jar and start over - you can't feed it away. The clean test: liquid layer = feed it; fuzzy or coloured spots = bin it. Keeping the jar away from the fruit bowl and feeding on schedule prevents almost all mold.
Why journal it
Sourdough is the kind of project where days blur together and patterns are invisible without a record. Sourdough Tracker keeps each feed, each rise %, each ambient temperature, each photo in one continuous timeline per starter. Two weeks in, the rhythm of your starter (it's different from everyone else's) becomes obvious - and that's when your bakes start landing.
Infographic: starter, start to finish
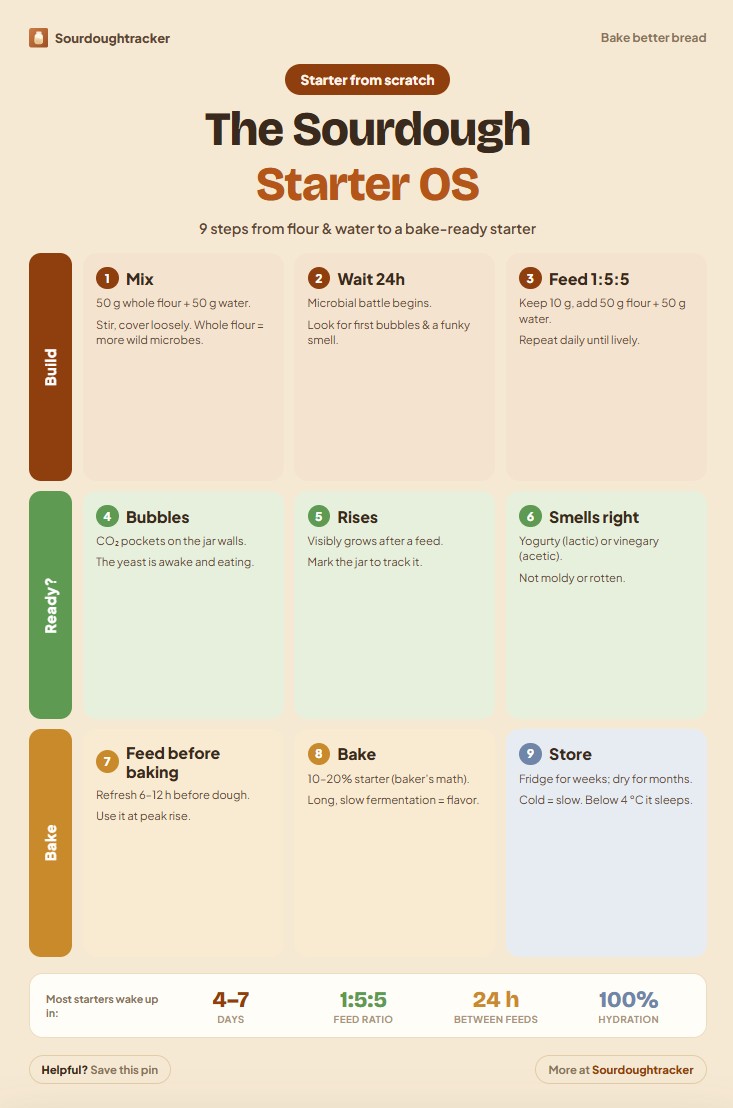
Here's the whole thing on one page. Tap it to download, or pin it for your next bake.
 Download
FAQ
Frequently asked
Try Sourdough Tracker
Free plan, no credit card. We host in Germany. You can export and delete everything self-serve.
Read next
Troubleshooting a sluggish or 'dead' sourdough starter
The decision tree for reviving a starter that stopped responding.
Read
Sourdough starter troubleshooting: fix any starter problem
Match any starter symptom to its cause and fix.
Read
7 Signs Your Sourdough Starter Is Ready to Bake - Don't Miss #4
Seven reliable signs your starter is at peak - ranked by how much they actually matter.
Read
The best flours for sourdough - and when to pick which
A practical round-up of the flours every home baker actually uses.
Read
How to name your sourdough starter (200+ ideas)
Once it doubles, give it a name - bakers who name their starter feed it more reliably.
Read
Why Is My Sourdough Starter Not Rising? (and How to Fix It)
Hit the day 3-5 stall? Here is exactly why a young starter stops rising.
Read